


Exchange - Outlook
We recommend the following mail clients:
Browser access
Windows
- Outlook for Windows (Outlook 365 version)
 The new Outlook (Outlook NEW) is not supported for data protection reasons.
macOS
- Outlook for Mac (Outlook 365 version)
- Mac mail, calendar and contacts (limited support)
Linux
- Thunderbird via IMAP (limited support)
Mobile devices such as smartphones and tablets via ActiveSync
- Mail app for iOS
- Mail app for Android
- The Outlook app for mobile devices is not supported for data protection reasons.
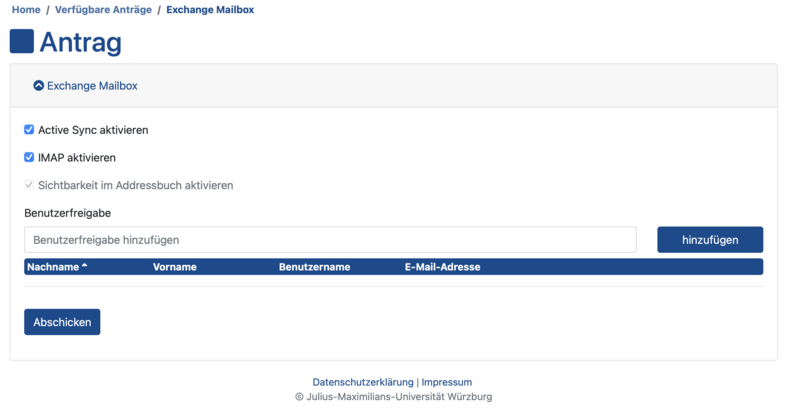
- Log in to the user portal.
- Under the Applications menu item, go to the Available applications option.
- Select the Exchange Mailbox application here.

- Tick the box next to the desired service.
- Confirm your selection with the Submit button.
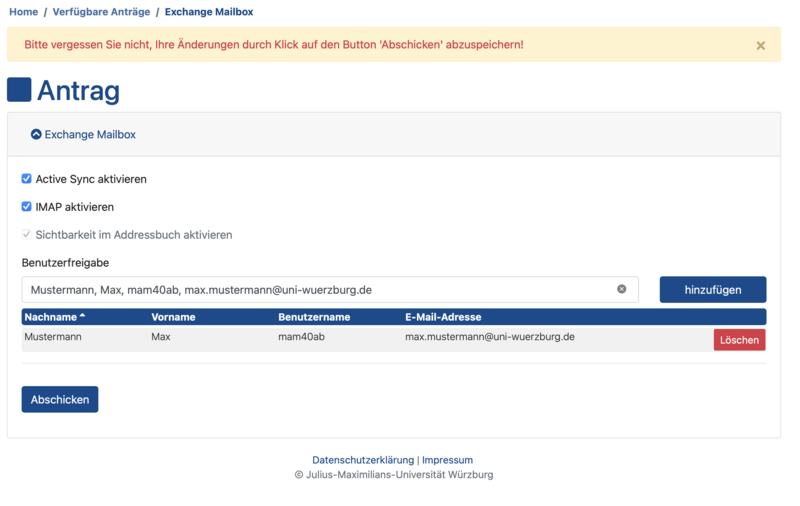
- Log in to the user portal.
- Under the Applications menu item, go to the Available applications option.
- Select the Exchange Mailbox application here.
- Now enter the desired user under User authorisation.
- Add the user via Add.

- Confirm the addition of the user with the Send button.
- The shared mailbox must now be added in Outlook. Include full access instructions.
To utilise the full functionality of Exchange, we recommend the use of Outlook 365, which can be installed via SCCM or manually.
JMU employees receive the licence and access to the installation files at no additional cost. People who use a managed device (i.e. on whose devices an SCCM client and the "Software Centre" are installed) will be able to download the installation files from the Software Centre in future.
All other employees can then log in with their personal university Microsoft account at https://go.uniwue.de/o365 and download the installation files there.
Outlook on the web:
https://mail.uni-wuerzburg.de
Exchange configuration IMAP (e.g. with Thunderbird; IMAP activation required):
Incoming mail server: imap.mail.uni-wuerzburg.de Port: 993, SSL/TLS
Outgoing mail server: mailmaster.uni-wuerzburg.de Port: 465, SSL/TLS
Exchange configuration Active Sync for mobile devices (activation of ActiveSync required):
Server address: mobile.mail.uni-wuerzburg.de
Link to Outlook on the web: https://mail.uni-wuerzburg.de
-
Select Settings > Automatic replies from the navigation bar.
-
Select the option Send automatic replies.
-
Tick the Send replies only during this period checkbox and then enter a start and end time to control when automatic replies are sent.
If you do not specify a time period, the automatic reply remains activated until you deactivate it by selecting Do not send automatic replies.
-
Tick the checkbox for any of the following options that you are interested in:
-
Block my calendar for this period
-
Automatically decline new invitations for events during this period
-
Decline and cancel my meetings during this period
If you want senders outside your organisation to receive automatic replies, select the checkbox for Send automatic replies to senders outside my organisation.
-
-
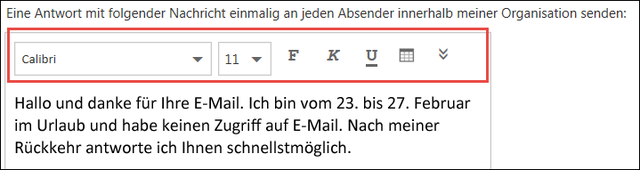
In the field at the bottom of the window, enter a message to be sent to people during your absence.
-
If you wish, you can highlight your message and use the formatting options at the top of the box to change the font and colour of the text, add an emoji or customise your message in other ways.
-
When you're done, select OK at the top of the page.
If you have not set a time period for automatic replies (step 4 above), you will need to disable them manually. To disable automatic replies, sign in to Outlook on the web, select Settings > Automatic replies, and then select Don't send automatic replies.
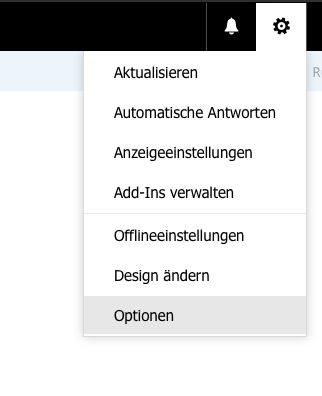
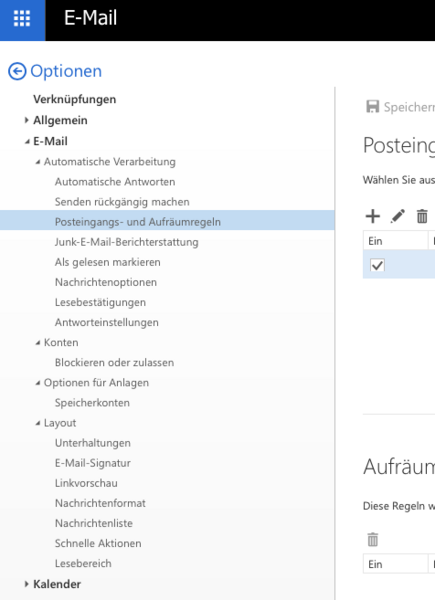
- At the top of the mail.uni-wuerzburg.de page, select Settings (cogwheel) > Options
- Then select the following options: Inbox and clean-up rules.

- You can now create a new rule by clicking +.

-
Go to Settings
 > Show all Outlook settings > Compose and reply.
 -
Under Email signature, enter your signature and change its appearance using the available formatting options.
- If you want your signature to appear at the bottom of all new email messages you compose, tick the Automatically include my signature in new messages I compose check box.
-
If you want your signature to be displayed in messages that you forward or reply to, tick the Automatically include my signature in messages that I forward or reply to checkbox.
-
If you do not select these options, you can manually add your signature to a selected message. For more detailed information, see Manually adding a signature to a new message.
-
When you are finished, click Save.
Preparation in the user portal
- Log in to the user portal with the functional account via the [Functional account] option - do NOT log in via WueLogin with your personal account
- Available applications - Exchange: Mailbox - View button
- under"Share mailbox with the following users", enter yourself or all users who want to integrate the functional account in Outlook.
Wait a few minutes before adding the functional account as an additional account in Outlook:
Add the function account as an additional account in Outlook
- Click on on File > Add account
- Enter the email address of the functional account here
- Click on Connect
- The following appears Account successfully added
- Restart Outlook
Depending on the size of the mailbox, synchronising the mails may take a while. Outlook provides information on this in the bottom status bar and displays All folders are up to date when synchronisation is complete.
Troubleshooting
If you are asked to enter your access data during the process, enter your personal password and tick the box next to Save login data.
If the user name is not your own but that of the functional account, click on Use another account.
For the user name, enter your personal user name with @uni-wuerzburg.eu ending .
For example, abc12xy@uni-wuerzburg.eu with your personal password. Tick the box next to Save login data.
You can find pdf instructions HERE.
-
Select File > Automatic replies.

-
In the Automatic replies field, select the Send automatic replies option.
Optionally, you can set a date range for your automatic replies. This will disable automatic replies at the date and time entered as the end time. Otherwise, you will need to deactivate automatic replies manually.
Note: If automatic replies are not displayed, set up your out-of-office message using "Rules and Notifications".
-
On the Within my organisation tab, enter the reply to be sent to team members or colleagues during your absence.
Note: By selecting Everyone outside my organisation, your automatic replies will be sent to all email addresses, including senders of newsletters, promotional emails and potential junk emails. If you want to send automatic replies to people outside your organisation, we recommend selecting Only my contacts.
-
Select OK to save your settings.
Deactivating automatic out-of-office replies
If Outlook is set up to send automatic replies, a message with this information will be displayed below the ribbon. Select Deactivate to disable automatic out-of-office replies. If you want to change the date information for your auto reply or sent message, follow the steps above to change your settings.
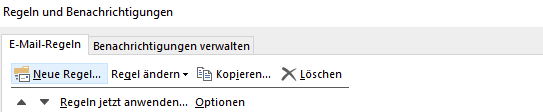
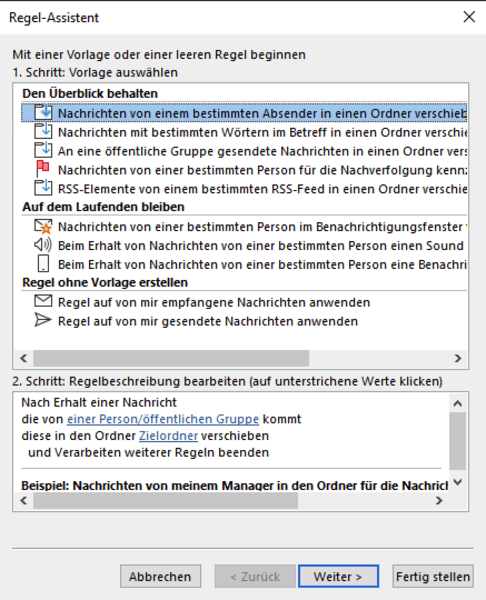
-
Select File > Manage rules and notifications.

-
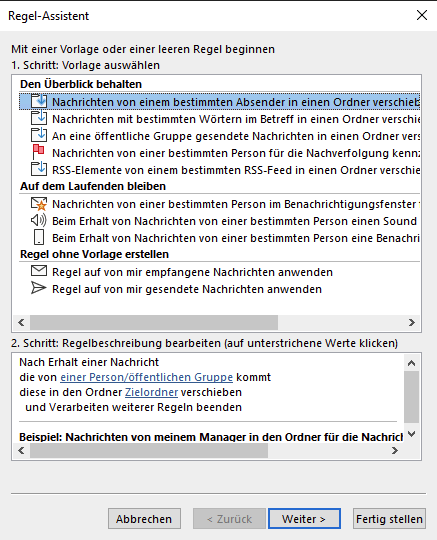
Go to the New rule item.
-
You can now choose between templates or create your own rule under "Create rules without template".

To solve problems with the Outlook client (connection problems with the server, repeated popping up of the login window, etc.), it is normally sufficient to create a new Outlook profile,
You can find detailed instructions HERE
- Click on File > Options > Email.
- Under Compose messages, click Signatures.
- Under Select signature to edit, select New and enter a name in the New signature dialogue box. name for the signature in the New signature dialogue box.
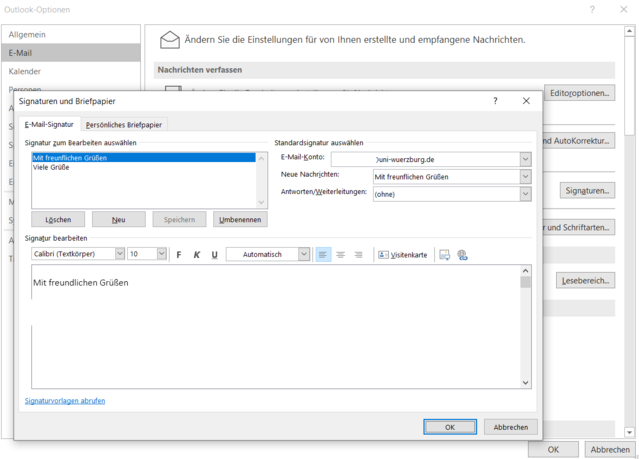
- You can now create a signature in the text field below.
- Close the menu with OK.
-
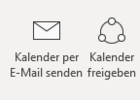
In the Calendar folder in the Start menu, select the Share calendar option.
-
You can search for people from your address book or enter an email address in the To field.
-
The person you have shared your calendar with will receive a sharing invitation by email.
-
As soon as the recipient clicks on Accept, their shared calendar is displayed in their calendar list.
I see the error message "This calendar cannot be shared"
If a message with the message This calendar cannot be shared is displayed, there are three possible reasons.
-
The email address is invalid.
-
The email address is a group
The email belongs to an external user who is not part of your organisation.
Which authorisations people have for your calendar
You can choose from several different authorisation levels when sharing your calendar.
-
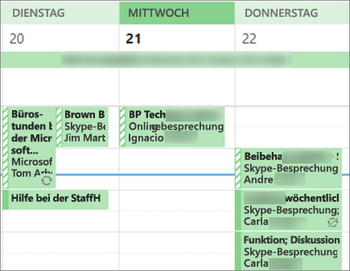
Can show when I am busy. People who share your calendar with this authorisation level can only see the times at which you are available, as shown in the

-
Can show titles and locations. People who share your calendar with this authorisation level can see the availability, subject and meeting location as shown here:
-
Can view all details People who share your calendar with this permission level will see all the details of your appointments, just like what you see.
-
Click on Calendar.
-
Click Start > Calendar permissions.
-
On the Permissions tab, click the name of the user and select Remove.
-
Click OK.
A digital signature is not the same as a signature that you regularly add to an outgoing message. Anyone can copy a signature in an email, which is basically just a customisable closing salutation. In contrast, a digital signature can only be used by the owner of the digital signature. The digital ID makes it possible to verify the authenticity of the sender and thus helps to prevent the manipulation of messages.
Setting up a digital signature
To encrypt emails using your digital signature, proceed as follows in Outlook:
-
In Outlook, selectFile > Options > Trust Centre > Settingsfor theTrust Centre.
-
Select Email Security in the left pane.
-
UnderEncrypted email, select the Settings option.
-
UnderCertificates and algorithms, select Select and then select theS/MIME certificate.
-
Select OK.
You can then encrypt a message as follows:
-
In a new email message, select File > Encrypt.
-
Select the encryption option with the restrictions you want to enforce, e.g.Do not forward.
-
Finish composing your email and then select Send.
You can find more information on encrypting emails here.
Setting up Exchange on the iPhone and iPad
The Outlook app for mobile devices is disabled for data protection reasons.
Setting up Exchange on Android
The Outlook app for mobile devices is disabled for data protection reasons.